Editing / Adding Tasks
Once you have created a task group then you can add or edit tasks within it. This applies whether or not the task group contains a rule to automatically generate tasks from submissions.
Selecting the Task
- Click on the task in the table view

Select task from table view
For the task you want to edit click on the button with the edit icon in the edit column.
- Or Click on the task location in the map view

Select task from map view
- Or Click on the task calendar entry in the map view

Select task from calendar view
Adding a Task
From the menu bar select Tasks then Add Task.
Task Settings Dialog
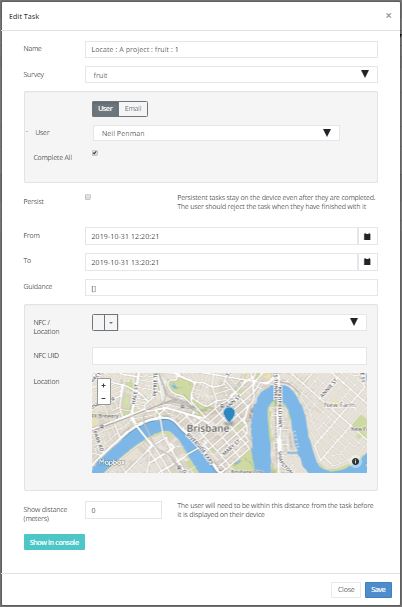
Task Settings Dialog
- Set the task name
- Set the survey to be completed
- Assign the task
When editing the task, or creating an ad-hoc task, it can only be assigned directly to a user of the system or to 1 or more email addresses. The option of assigning to users of a role is only available when creating tasks automatically from submitted data.
The complete all checkbox can be selected if you want all assigned users to complete the task.
Note
If the complete all checkbox is not selected and you assign a task to multiple people then that does not mean that only the results from the first person to complete will be accepted. Two people can work on a task simultaneously and submit the results. However by not selecting complete all, once one person has submitted a response, any other assignee who refreshes fieldTask or their web browser will have the task cancelled so they can not / need not start it. In the case of email tasks the email cannnot be cancelled and a followup email asking the recipient to disregard the previous email is not sent. So for email tasks this checkbox has no effect.
The Self Assign checkbox can be selected if you want to allow users to accept a task themselves.
- Optionally set the task to persist in fieldTask. If this checkbox is set then the task will stay in FieldTask even after the user has completed it. The user can then complete the task multiple times and when they are finished they can reject it by doing a long press on the task name.
- Set the start date and time of the task and the end date and time.
- Add guidance. This is a free form text field. If the task was originally created as an automatic task from submitted data then this will be filled with the address data, that is answers to questions in the submitted survey. However when editing the task you can enter any text.
- Set the location of the task
Task locations can be GPS coordinates and/or an NFC chip that the user swipes with their phone in order to launch the task.
Use a named Location
Named locations are specified in shared resources. (Shared Resources)

Selecting a Named Location
Specify a new Location
Alternatively just click on the map and/or type in the ID of an NFC chip.
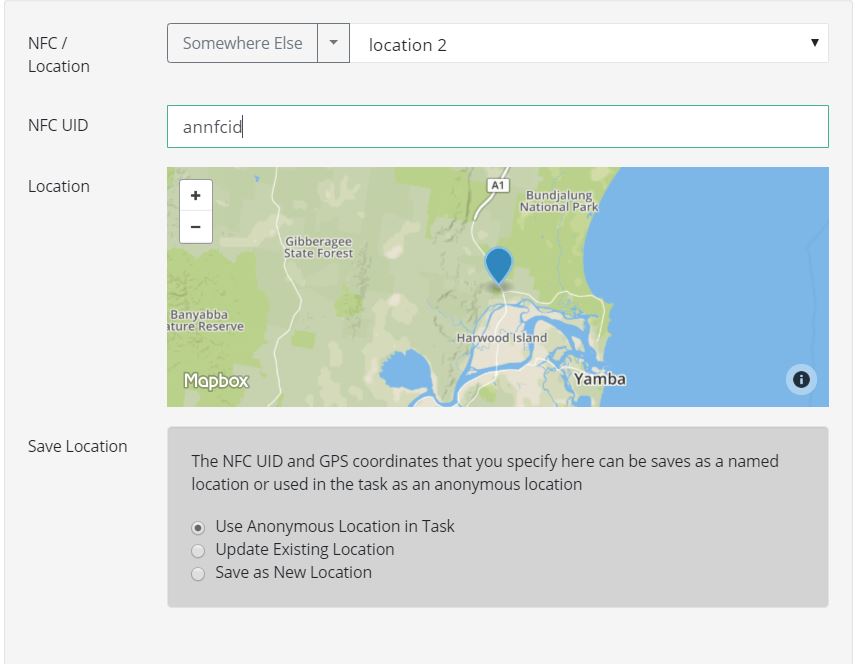
Specifying a New Location
When specifying a new lcoation you can optionally update an existing named location or create a new named location with those coordinates and/or NFC id.
- Optionally set the download distance
If you are assigning a lot of tasks and you want the task to only be visible if the user is close to it then specify a download distance.
- If this task updates a record of data then you can click on the button "Show in Console" to view the record in the console.