Your Profile Menu
Every page in the server has a profile menu at the right hand end of the menu bar, shown as a person icon. It holds the settings that belong to you rather than to a survey or an organisation, and it is where you sign out.
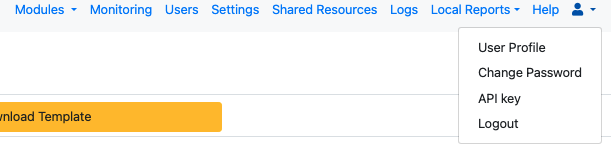
The profile menu
Not every option appears on every page, and some depend on the security groups you belong to, so your menu may be shorter than the list below.
My Tasks
Shown on the pages that deal with tasks, with the number of tasks currently assigned to you in brackets. It takes you to your own task list.
User Profile
Opens a dialog holding your personal details. Note that this one entry is labelled the same as the menu itself, which is why it is easy to miss that the menu has other options.
You can set:
- Name
Your display name. This is not the identifier you sign in with, which cannot be changed here.
- Language
The language of the server. English, Spanish, Ukrainian, French, Hindi, Arabic and Portuguese are available, with the first three being the most complete. If you would like to help translate the server into another language, contact support.
Your email address. You need this if you ever have to reset a forgotten password, so it is worth keeping current.
- Organisation
If you have been given access to more than one organisation you can switch between them here. See Users.
- Enterprise
A higher level of compartmentalisation than an organisation.
- Time Zone
The time zone used when showing you data and when generating your reports.
Press Save to apply the changes.
Change Password
Opens a page where you set a new password. You need your current password to do it.
Your server or organisation may set a minimum password strength, in which case a password that is too easily guessed will be rejected. See Password Strength.
Note
Changing your password signs out any web forms you had open using a saved link, and applies to FieldTask and the API as well, so a device will need the new password the next time it connects.
API key
Opens a dialog for managing the tokens that let a program sign in to the API as you, rather than using your password. See Server APIs for what can be done with them.
You can hold more than one token at a time, which lets you give a separate one to each program and withdraw one without disturbing the others. For each token you give:
- Name
A label so you can tell later what the token was for.
- Expires (days)
How long the token should last. Choose Never only where a fixed lifetime is genuinely impractical.
The list below shows the tokens you already have, when each was created, when it expires and when it was last used, with a Revoke button against each. Revoking takes effect immediately.
Warning
The token is displayed once, at the moment you create it. The server keeps only a hash of it and cannot show it to you again. Copy it straight away. If it is lost, revoke it and create another.
Two Factor Authentication
Two factor authentication asks for a code from your phone as well as your password, so that somebody who has learned your password still cannot sign in. It is optional and you turn it on for yourself.
Smap uses standard time based one time passwords, so any of the usual authenticator apps will work, including Google Authenticator, Microsoft Authenticator, Authy, 1Password, Bitwarden, FreeOTP and Aegis.
Turning it on
Choose Two Factor Authentication from the profile menu.
Scan the QR code with your authenticator app. If the phone cannot scan, type the key shown underneath it into the app by hand instead.
Enter the six digit code the app displays and press Turn on.
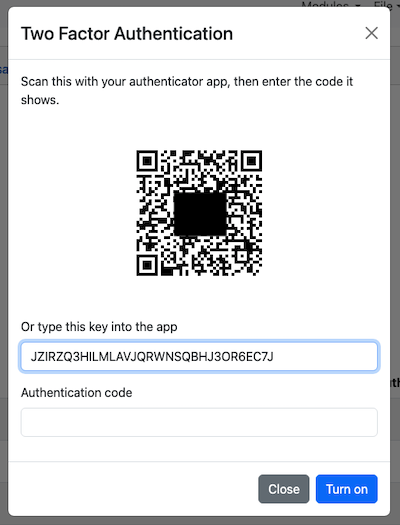
Add two factor authentication
The entry the app creates is labelled with the name of the server, so if you use more than one Smap server you can tell them apart.
Nothing changes until that code is accepted, so closing the dialog partway through leaves your account exactly as it was.
Signing in from then on
After you enter your username and password you are asked for a code. Enter the six digit code currently shown in your authenticator app.
The code is accepted once per browser session, so you are not asked again while you keep working. Closing the browser and returning means entering a new one. Codes change every thirty seconds and each one can only be used once.
If a code is rejected, check the clock on your phone. Time based codes rely on the phone and the server agreeing on the time, and a phone whose clock has drifted is the usual cause. After several wrong attempts you are asked to wait a minute before trying again.
Turning it off
Choose Two Factor Authentication from the profile menu again, enter a current code and press Turn off. A code is required so that somebody who has got hold of an open session cannot simply switch the protection off.
Once it is off you sign in with your password alone, until you choose to set it up again.
If you lose your phone
There are no recovery codes. Ask an administrator to turn two factor authentication off for your account, sign in with your password, and set it up again against your new phone. See Two Factor Authentication.
Note
Two factor authentication protects the web console. FieldTask and the API authenticate separately, with a password or a token, and are not affected by it. Someone who has your password can still use those, so a password that may have been exposed should be changed rather than relied on being covered by the second factor.
Logout
Signs you out.
Note
If you are using Firefox you will also need to close Firefox in order to complete the logout.