Shared Resources
To get to shared resources select the Admin module and then Shared Resources.
Shared resources are made available to all surveys in an organisation. They consist of:
Images, Video, Audio that can be included in questions and choices
Spreadsheets that contain reference data accessed using the search() function and the pulldata() function
Maps used on the server for analysis
Offline map layers that are downloaded by FieldTask
Locations
SharePoint lists used as reference data (from SmapServer v26.05), see SharePoint Lists as Shared Resources
DHIS2 organisation units and option sets used as reference data (from SmapServer v26.09), see DHIS2 organisation units as a shared resource and DHIS2 option sets as choice lists
Spreadsheets
Spreadsheets loaded as a shared resource file contain tables of reference information which can be used to get lists of choices for a select question or lookup a value. Spreadsheets loaded here can be used by any survey.
A spreadsheet can be added by uploading a CSV file or an Excel XLSX file.
In the upload dialog box you can specify the name that is used to reference the data
You cannot upload a file with the same name as an existing file, instead use the "replace" button to replace the existing file.
A history is kept of changes to each spreadsheet. Select the history button next to the shared resource file to view. This history includes the original uploaded file but only for the last 10 uploads. Earlier uploads are deleted and the download button is disabled.
The download button on the Spreadsheet page will download the CSV contents as used in surveys. If you are editing in an XLSX file, which is recommended, then you can go to the history page and download the latest XLSX version of the data as it was originally uploaded.
Media Files
Images, video, audio files loaded here can be used by any survey.
Maps
Maps from Mapbox can be used as the basemap for a map view on the analysis page or the console map. These maps can be one of the standard maps:
mapbox/light-v10
mapbox/dark-v10
mapbox/streets-v11
mapbox/outdoors-v11
mapbox/satellite-streets-v11
Alternatively you can design your own maps that are customised to your requirements using the Mapbox Studio. You will need you own account on Mapbox to design your own maps and you will need to set the key for that mapbox account in your organisation settings.
To add a shared map click on the "Add Map" button and then fill in the dialog shown below. For the Map Id you can use one of the standard mapbox Id's listed above.
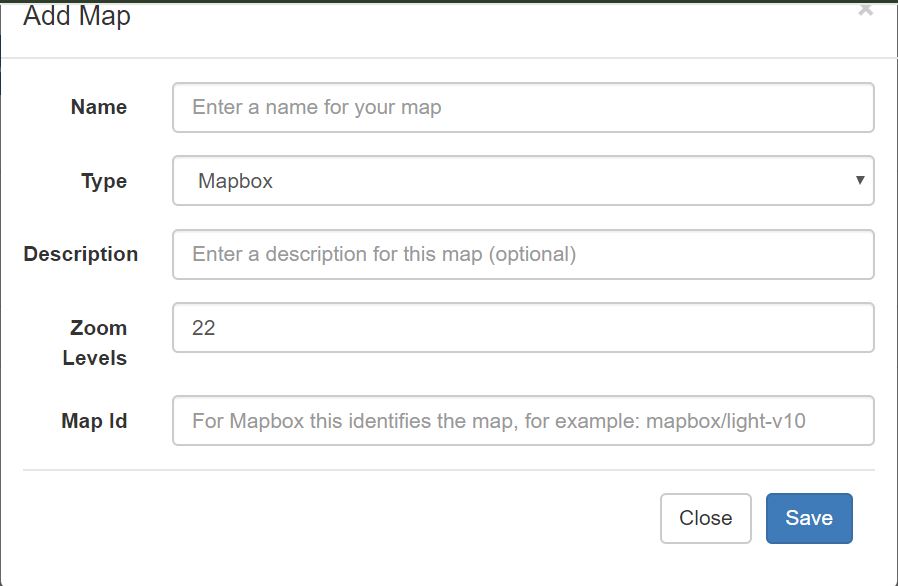
Add Map Dialog
Offline Maps
Requires SmapServer 26.08+.
Select the Offline Maps tab.
Offline map layers are mbtiles files that FieldTask shows over the basemap when there is no network coverage in the field. Rather than copying the file onto each device by hand, you upload it here, choose which projects need it, and FieldTask downloads it the next time each device refreshes.
To use this you must first select Manage offline map layers on the server in the Mobile App Options tab (Mobile App Options). The phone user chooses which of the layers they have been given is displayed, and a layer that came from the server can only be removed by unassigning it here. They can still add their own layers on the device as before, which is the only way to load a file that is too large to upload here.
To add a layer press the Add Offline Map button and then:
Give the layer a name. This is the name the phone user sees, and it must be unique within your organisation
Add a description if it helps your administrators
Select the mbtiles file. Files of up to 500 MB are accepted
Tick the projects that should get this layer
The upload shows a progress bar as these files are large. To replace a layer, edit it and select a new file. Devices notice that the file has changed and download the new version. If you only want to change the name, description or which projects get the layer then leave the file empty.
Layers are assigned to projects rather than to individual users. Everybody with access to a selected project gets the layer, in the same way that they get the surveys in that project. A user in more than one project that has been given the same layer still only downloads it once. If one person needs a layer, give it to a project that only they have access to.
Creating an mbtiles file
An mbtiles file holds a set of map tiles in a single file. Smap does not create these files, you make them from your own map data before uploading them here.
QGIS can do this without any extra plugins. Load the layers you want, then select Processing, Toolbox, Raster tools, Generate XYZ tiles (MBTiles). Set the extent to the area your field teams work in and choose the range of zoom levels you need. MapTiler will also produce these files. If you already use GDAL then:
gdal_translate -of MBTILES myimage.tif mylayer.mbtiles
gdaladdo -r average mylayer.mbtiles 2 4 8 16
Keep both the area and the range of zoom levels as small as you can. Each additional zoom level roughly quadruples the number of tiles, and the whole file has to be downloaded onto every phone that needs it.
Raster and vector layers
An mbtiles file contains either raster tiles, which are images, or vector tiles, which are shapes and their attributes. To check which you have look at the format recorded in the file:
sqlite3 mylayer.mbtiles "select value from metadata where name = 'format';"
A value of png or jpg is a raster layer. A value of pbf is a vector layer.
Use raster layers wherever you can. They are shown whichever basemap the phone user has chosen, and they look on the phone the way they looked when you created them.
Vector layers are much more limited:
They are only drawn when the phone user has selected Mapbox as their basemap. With Google or OpenStreetMap selected the layer is ignored
They are drawn without any styling. FieldTask cannot tell that one shape is a road and another is a river, so every layer inside the file is drawn as thin lines in a colour chosen automatically from the layer name. Areas appear as outlines rather than filled, and there are no place names
Vector files are considerably smaller than the equivalent raster ones, which is worth having when a team is downloading over a poor connection. Against that, a vector layer is only useful for showing something simple over the basemap, such as a boundary or a set of plot outlines. It will not look like a map. If your field teams need a readable map where there is no coverage, supply it as raster.
Checking that devices have the offline map
The Devices column counts the devices that have told the server they hold the current version of an offline map. Devices report this each time they refresh, so use it to confirm that a field team has its maps before they go out of coverage.
The count only includes devices holding the current version. If you replace an offline map the count drops back and climbs again as devices download the new file.
Note
These files are large and field devices are often on a poor or expensive connection. A device only downloads a layer automatically when it has wifi. A download interrupted part way through resumes from where it stopped rather than starting again, and a layer already on the device is never fetched twice. A phone user who needs a layer sooner can start the download over mobile data from Settings then Maps in FieldTask.
Locations
Select the Location tab.
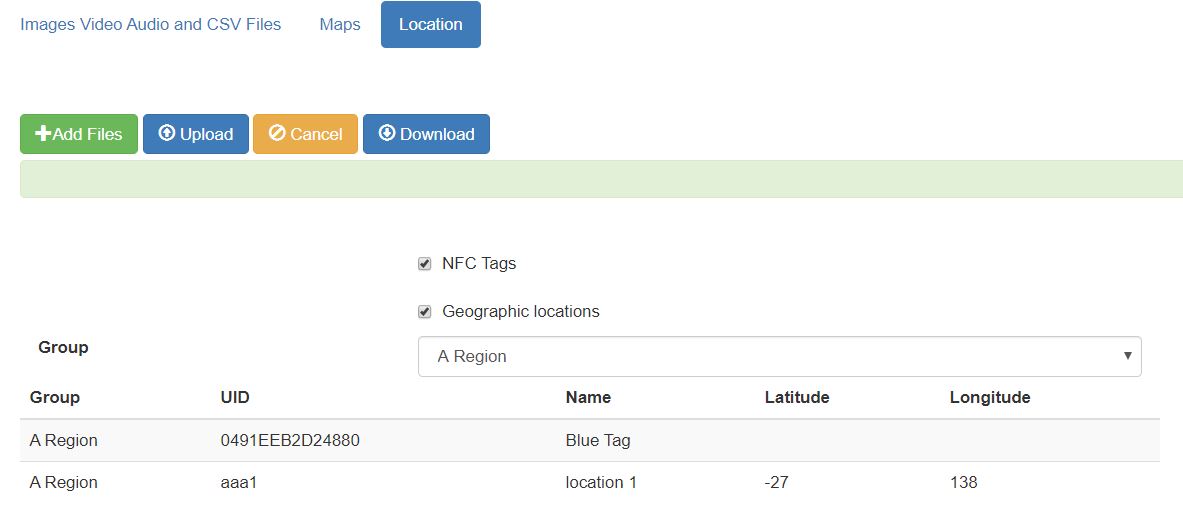
Locations
Locations identify where a task should take place. They consist of GPS Coordinates and/or the ID of an NFC chip that will launch the task. The use of NFC chips allows a much greater precision in identify the task location as the NFC chip may be on a particular piece of equipment that needs to be maintained or control access to a room where the survey needs to take place.
When Editing / Adding Tasks you can select a named location rather than specifying the GPS coordinates / NFC chip. However you can also create new named locations while adding tasks.
Locations are stored in Groups which are defined in a spreadsheet. One group per worksheet.
Editing / Adding Groups
Click the download button. This will download all the groups of locations into a spreadsheet. If there are no existing locations then this spreadsheet will have a single default worksheet called Group. The headings are:
UID - Enter the ID of the NFC chip here
name - name of the location
lat - Latitude of the location
lon - longitude of the location
Rename the group worksheet. Add additional groups if required. Add locations to these groups and then to upload and replace the existing locations:
Click on Add Files
Click on Upload